Thursday, February 25, 2016

Time for the Branch-FW configuration.

We need to start by changing the IP address:
gw-020000> set interface eth0 ipv4-address 192.168.1.222 mask-length 24
gw-020000> set interface eth0 
auto-negotiation - Configure auto-negotiation 
comments         - interface Comments
ipv4-address     - Interface IPv4 address
ipv6-address     - Interface IPv6 address
ipv6-autoconfig  - Configure IPv6 auto-configuration 
link-speed       - interface link speed
mac-addr         - Configure hardware address
monitor-mode     - set monitor-mode for interfaces
mtu              - interface Mtu
rx-ringsize      - Set receive buffer size for interface
state            - interface State
tx-ringsize      - Set transmit buffer size for interfaces
gw-020000> set interface eth0 state on
gw-020000>
gw-020000> save config
gw-020000>
Let's just check that we can access one FW from the other:
This system is for authorized use only.
login: admin
Password: 
Last login: Sun Feb 21 18:20:23 on ttyS0
gw-010000> ping 192.168.1.222
PING 192.168.1.222 (192.168.1.222) 56(84) bytes of data.
64 bytes from 192.168.1.222: icmp_seq=1 ttl=64 time=3.36 ms
64 bytes from 192.168.1.222: icmp_seq=2 ttl=64 time=0.701 ms

--- 192.168.1.222 ping statistics ---
2 packets transmitted, 2 received, 0% packet loss, time 999ms
rtt min/avg/max/mdev = 0.701/2.034/3.368/1.334 ms
^C
gw-010000> 
OK, So, can we get this new FW into our existing SmartDashboard?? Let's try! We do need to run through the initial set-up first, through the web browser, we cant just go ahead end put it into SmartDashboard. It is also important to remember the topology. The PC is using an IP address of 10.1.1.21, but the Branch-FW only knows about the 192.168.1.0/24 network, so we need a route:
gw-020000> set static-route 10.1.1.0/24 nexthop gateway address 192.168.1.111 on 
gw-020000> 
Now we have reachability, notice the extremely "open" rule in the rule base, and that we have reachability from the switch:

This means we can go ahead with the initial setup:


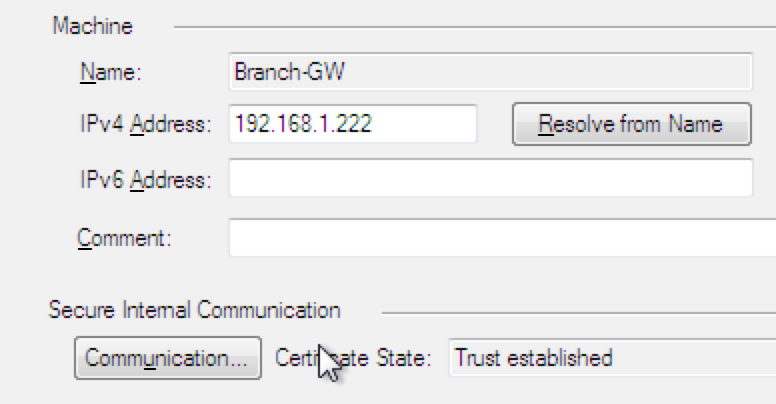
I have not included all the steps, as they are no different to how we configured the HQ-FW. But because I immediately jumped in and tried to add it to SmartConsole, without going through the above steps, it will not initialize SIC  - so I had to reset the SIC connection, before I got the green tick:


So, what shall we do now? Well, let's add some routing into the mix.

We'll try it our through the CLI first and see how far we get without having to resort to the GUI.
Following the KISS method, everything will be in area 0 (the backbone):
gw-010000> show configuration ospf
set ospf area backbone on
set ospf interface eth0 area backbone on
set ospf interface eth0 priority 1
gw-010000> 

gw-020000> show configuration ospf
set ospf area backbone on
set ospf interface eth0 area backbone on
set ospf interface eth0 priority 1
gw-020000> 
In the interest of full-disclosure, I did have to remove all of the policies from the Branch router, something in the rule base was preventing OSPF from working, so now we get OSPF working, but SIC does not.

This is the rule base I have at the moment:


The good news is that OSPF is working:
gw-010000> show ospf neighbors

Neighbor state flag: G - graceful restart  

Neighbor ID     Pri   State      Dead  Address         Interface       Errors  
192.168.1.222   1     FULL/DR    34    192.168.1.222   192.168.1.111   0  

gw-010000> 

gw-020000> show ospf neighbors

Neighbor state flag: G - graceful restart  

Neighbor ID     Pri   State      Dead  Address         Interface       Errors  
10.1.1.111      1     FULL/BDR   32    192.168.1.111   192.168.1.222   0  

gw-020000>
We can also confirm this from the GUI:


We can add interfaces, and OSPF updates nicely:
gw-020000> show route
Codes: C - Connected, S - Static, R - RIP, B - BGP (D - Default),
       O - OSPF IntraArea (IA - InterArea, E - External, N - NSSA)
       A - Aggregate, K - Kernel Remnant, H - Hidden, P - Suppressed,
       U - Unreachable, i - Inactive

S         0.0.0.0/0           via 192.168.1.111, eth0, cost 0, age 201382  
S         10.1.1.0/24         via 192.168.1.111, eth0, cost 0, age 201382  
C         127.0.0.0/8         is directly connected, lo  
O         172.16.1.0/24       via 192.168.1.111, eth0, cost 2, age 2  
C         172.16.2.0/24       is directly connected, eth2  
                                  DMZ  
C         192.168.1.0/24      is directly connected, eth0  
gw-020000> 
So, now can we get OSPF working and SIC? Should do, it's just about proper placement of ACLs.

Let's start by unassigning the policy:
gw-010000> fw unloadlocal

Uninstalling Security Policy from all.all@gw-010000
Done.
gw-010000> 
Let's start with a cleaner rule base, not ideal, but definitely cleaner:


This gets applied to our HQ gateway. We then reinitialize SIC:


Then, once SIC is healthy again, push the same policy to the branch gateway. Now OSPF is healthy as well!
gw-010000> show ospf neighbors

Neighbor state flag: G - graceful restart  

Neighbor ID     Pri   State     Dead  Address         Interface       Errors  
192.168.1.222   1     FULL/DR   31    192.168.1.222   192.168.1.111   0  

gw-010000> show route
Codes: C - Connected, S - Static, R - RIP, B - BGP (D - Default),
       O - OSPF IntraArea (IA - InterArea, E - External, N - NSSA)
       A - Aggregate, K - Kernel Remnant, H - Hidden, P - Suppressed,
       U - Unreachable, i - Inactive

S         0.0.0.0/0           via 10.1.1.1, eth1, cost 0, age 205827  
C         10.1.1.0/24         is directly connected, eth1  
C         127.0.0.0/8         is directly connected, lo  
C         172.16.1.0/24       is directly connected, eth2  
                                  DMZ  
O         172.16.2.0/24       via 192.168.1.222, eth0, cost 2, age 386  
C         192.168.1.0/24      is directly connected, eth0  
gw-010000> 
OK, so progress is being made. It's all about learning the differences and the quirks. Next up will be a look at saving and backing up configurations.

Sunday, February 21, 2016

Today I'll be setting up R77.30 on UNetLab. The idea being that it will be much easier to create labs.

Whilst the mixture of UNetLab and Qemu goes great for the most part, because we need to partly install the GAIA operating system BEFORE moving it to UNetLab, this is slightly more tricky.

We start off by setting up a new VM in VirtualBox, with 20GB disk space, 2048Mb memory and one CPU. I have set it to boot from the ISO disk.

It starts to boot:


We set the management interface:


Then set the IP address information:


Installation continues:


And finishes:


Once it starts to reboot, shut down the VM, and then we can export it to OVA:


Once it has exported, copy the resulting OVA file to the UNetLab machine, preferably to a folder called "cpsg-77-30", and follow the steps below:
Stuarts-MacBook-Pro:~ stuart$ ssh root@192.168.0.16
root@192.168.0.16's password: 
Welcome to Ubuntu 14.04.3 LTS (GNU/Linux 3.16.7-ckt8-unetlab x86_64)

 * Documentation:  https://help.ubuntu.com/
Last login: Thu Feb 18 10:20:11 2016 from 192.168.0.35
root@unl01:~# cd /opt/unetlab/addons/qemu/cpsg-R77-30/
root@unl01:/opt/unetlab/addons/qemu/cpsg-R77-30# ls
CheckPoint-77-30.ova
root@unl01:/opt/unetlab/addons/qemu/cpsg-R77-30# tar -xf CheckPoint-77-30.ova 
root@unl01:/opt/unetlab/addons/qemu/cpsg-R77-30# ls
CheckPoint-77-30.ova  CheckPoint-77-30.ovf  CheckPoint-disk1.vmdk
root@unl01:/opt/unetlab/addons/qemu/cpsg-R77-30# /opt/qemu/bin/qemu-img convert -f vmdk -O qcow2 CheckPoint-disk1.vmdk hda.qcow2
root@unl01:/opt/unetlab/addons/qemu/cpsg-R77-30# ls
CheckPoint-77-30.ova  CheckPoint-77-30.ovf  CheckPoint-disk1.vmdk  hda.qcow2
root@unl01:/opt/unetlab/addons/qemu/cpsg-R77-30# rm -f CheckPoint-*
root@unl01:/opt/unetlab/addons/qemu/cpsg-R77-30# ls
hda.qcow2
root@unl01:/opt/unetlab/addons/qemu/cpsg-R77-30#
root@unl01:/opt/unetlab/addons/qemu/cpsg-R77-30# /opt/unetlab/wrappers/unl_wrapper -a fixpermissions
root@unl01:/opt/unetlab/addons/qemu/cpsg-R77-30#

Our topology looks like this:


Before we do anything, we should change the IP address (to 10.1.1.111 to follow the CBT Nuggets CCSA videos), which we should be able to do via telnet:


gw-010000> set interface eth0 ipv4-address 10.1.1.111 mask-length 24
gw-010000> 
gw-010000> set interface eth1 state on
gw-010000> 
Now we can press ahead and start configuring the HQ-FW, as we can reach it from the Win box:


We connect using Internet Explorer, and start the configuration wizard:


A quick reboot later and we can log back in:


We grab the SmartConsole download.


Remember to install the MSVCR100 files before installing the SmartConsole stuff. Otherwise it won't work. The problem is that the Windows VM is not connected to the Internet, nor does it already have it installed. So, we have to download the 32-Bit version and copy it to the /tmp folder of the UNL box. We can then create an ISO file:
root@unl01:/opt/unetlab/addons/qemu/linux-lamp# mkisofs -o /opt/unetlab/addons/qemu/win-7-Pro/cdrom.iso /tmp/
I: -input-charset not specified, using utf-8 (detected in locale settings)
Total translation table size: 0
Total rockridge attributes bytes: 0
Total directory bytes: 116
Path table size(bytes): 10
Max brk space used 0
4564 extents written (8 MB)
root@unl01:/opt/unetlab/addons/qemu/linux-lamp#
We do then need to stop all the nodes, and start them so that the Windows box picks up the cdrom.iso file. We then just access the CDROM drive, and install the exe file, then install the SmartConsole stuff.

Setting up the SMS server is pretty similar to all the above steps, but we should find that we cannot access the HQ-FW (by icmp, or via the SmartConsole), because it is a Security Gateway (SG), so we need to access it through the SMS, we'll be needing the SIC activation key we set up during the SG installation. We can add it by right-clicking on "Check Point" and selecting "Security Gateway/Management":


Looks good:


Tomorrow we'll set up the Branch-FW, and start to look at how to actually make a network.

Saturday, February 20, 2016

I need to step up my Check Point skills, so let's have a little look through the CLI (GAIA) today.

I have a VM running (as a Security Gateway and Systems Management Server), it will talk happily to my Windows VM, which is running the SmartDashboard (and everything else), but as I am on the MAC laptop, SSH is my only option...

So let's see what the CLI offers us, starting with a ?:
gw-8090bc> 
 key can be used to complete / fetch the keyword.
 key can be used to see possible command completions.
'?' key can be used to get help on feature / keyword.
UP/DOWN arrow keys can be used to browse thru command history.
LEFT/RIGHT arrow keys can be used to edit command.
'!!','!nn','!-nn' etc. are valid form of executing history cmd.

At more prompt, following keys can be used-
SPACE key to see the next page.
ENTER key to see the next line.
Q/q key to exit to the cli prompt.

Useful commands:
show interface 
set interface 
add user 
save config
show commands
show commands feature 
show configuration
expert

gw-8090bc>
OK, not a huge amount here, but some useful stuff nevertheless. We can check out some interfaces:
gw-8090bc> show interface 

eth0  lo
gw-8090bc> show interface eth0
state on
mac-addr 00:50:56:80:90:bc
type ethernet
link-state link up
mtu 1500
auto-negotiation on
speed 1000M
ipv6-autoconfig Not configured
duplex full
monitor-mode Not configured
link-speed Not configured
comments 
ipv4-address 192.168.0.21/24
ipv6-address Not Configured
ipv6-local-link-address Not Configured

Statistics: 
TX bytes:1121127782 packets:768761 errors:0 dropped:0 overruns:0 carrier:0
RX bytes:51630307 packets:562656 errors:0 dropped:0 overruns:0 frame:0
gw-8090bc> 
I won't bother with any users for the moment, but remembering to save your work is very useful:
gw-8090bc> save config
gw-8090bc>
We also have a number of show commands, and the command "show commands" lists everything. Too much to put here. But we can use the feature command to make the results a little more concise (apologies for the formatting):
gw-8090bc> show commands feature 

aaa            aggregate   allowed-client    arp          as      asset
auditlog       backup      backup-scheduled  backups      bgp     bonding
bootp          bridging    cd                clienv       clock   cloning-group
command        commands    config            config-lock  config-state       
configuration  core-dump   cron              database     date                
default-route  dhcp        dns               domainname   download edition             
expert-password expert-password-hash         extended     fcd      format            
ftp            group       groups            host         hostname igmp              
inactivity-timeout  install  installer       instance     interface      
interfaces      iphelper     ipv6            ipv6-state   kernel-routes  
local          logging       mail-notification            management         
max-path-splits               mcvr           message      mfc               
mroute         neighbor       neighbor-entry net-access   netflow   ntp          
ospf           password-controls  pbr        pim          ping      pppoe             
protocol-rank  proxy              rba        rdisc        restore   restore_policy    
rip            route          route-redistribution        routed    routedsyslog   
routemap       routemaps      router-id      router-options         scp            
selfpasswd     slot           snapshot       snapshots    snmp      start          
static-mroute  static-route   stop           sysenv       syslog    tacacs_enable  
tag            tftp           time           timezone     trace     tracefile      
transaction    uninstall      upgrade        uptime       user      users          
version        virtual-system volume         vpn          vrrp      vsx            
web
gw-8090bc> show commands feature users
show users
gw-8090bc> show commands feature version
show version all
show version os build
show version os edition
show version os kernel
show version product
gw-8090bc> show version product
Product version Check Point Gaia R77.20 
gw-8090bc> 
From here we can get the version information, but there is an alternative way to do this, using the "fw" command:
gw-8090bc> fw feature
Usage:
fw ver [-h] ...                           # Display version
fw kill [-sig_no] procname                # Send signal to a daemon
fw putkey ...                             # Client server keys
fw sam ...                                # Control sam server
fw sam_policy ...                         # SAM policy editor
fw fetch targets                          # Fetch last policy
fw amw fetch                              # Fetch Anti-Bot & Anti-Virus policy
fw tab [-h] ...                           # Kernel tables content
fw monitor [-h] ...                       # Monitor VPN-1/FW-1 traffic
fw ctl [args]                             # Control kernel
fw lichosts                               # Display protected hosts
fw log [-h] ...                           # Display logs
fw logswitch [-h target] [+|-][oldlog]    # Create a new log file;
                                          # the old log is moved
fw repairlog ...                          # Log index recreation
fw mergefiles ...                         # log files merger 
fw lslogs ...                             # Remote machine log file list
fw fetchlogs ...                          # Fetch logs from a remote host
fw light                                  # fw light supported commands


gw-8090bc> fw ver
This is Check Point's software version R77.20 - Build 221
gw-8090bc> 
We can also see what policies are in use (which was configured via the GUI:
gw-8090bc> fw stat
HOST      POLICY     DATE            
localhost Standard   18Feb2016 17:18:10 :  [>eth0] [<eth0]
The configuration looks very different to Cisco's IOS. Instead of an indented hierarchical structure, we have a series of "set" commands, and we do not seem to be able to use a pipe and include directive, nor can we grep the results. Instead we need to narrow down conforming to the commands:
gw-8090bc> show configuration static
CLINFR0329  Invalid command:'show configuration static'.
gw-8090bc> show configuration static-route
set static-route default nexthop gateway address 192.168.0.1 on
gw-8090bc> 
It's possibly not as intuitive (initially) moving from IOS to GAIA, but I am sure with a couple of weeks practice, it will start to make sense. So, let's jump in at the deep-end and see if we can configure OSPF, mostly by using the tab key to show the options:
gw-8090bc> set ospf 
area                    - Area
default-ase-cost        - Default ASE Cost
default-ase-type        - Default ASE Type
export-routemap         - Routemap for Export Policy
graceful-restart-helper - Graceful_restart_helper
import-routemap         - Routemap for Import Policy
interface               - Interface
rfc1583-compatibility   - RFC1583 Compatible Mode
spf-delay               - SPF Delay
spf-holdtime            - SPF Holdtime
gw-8090bc> set ospf area backbone on
gw-8090bc> set ospf area 100      
nssa         - Not-So-Stubby Area
off          - Off
on           - On
range        - Address Range
stub         - Stub
stub-network - Stub Network
virtual-link - Virtual Link
gw-8090bc> set ospf area 100 on
gw-8090bc>
gw-8090bc>
gw-8090bc>
gw-8090bc> set ospf interface        

eth0  lo
gw-8090bc> set ospf interface eth0 
area                - Area
authtype            - Authentication Type
cost                - Cost
dead-interval       - Dead Interval
hello-interval      - Hello Interval
passive             - Passive Mode
priority            - Priority
retransmit-interval - Retransmit Interval
virtual-address     - Virtual Address
gw-8090bc> set ospf interface eth0 area 0
RTGRTG0019  Incomplete command.
gw-8090bc> set ospf interface eth0 area 0 
off - Off
on  - On
gw-8090bc> set ospf interface eth0 area 0 on
RTGRTG0019  OSPF: Area value must be an IPv4 address or between 1 and 4294967295 or backbone
gw-8090bc> set ospf interface eth0 area backbone on
gw-8090bc> 
Looks OK so far (but I only have one device running at the moment, so cannot really test. We can confirm the commands:
gw-8090bc> show configuration ospf
set ospf area backbone on
set ospf interface eth0 area backbone on
set ospf interface eth0 priority 1
set ospf area 100 on
gw-8090bc> 
Can we dig in any further? Sure!
gw-8090bc> show ospf 
border-routers - Border Routers
database       - Database
errors         - Errors
events         - Events
interface      - Interface
interfaces     - All Interfaces
neighbor       - Neighbor
neighbors      - All Neighbors
packets        - Packets
routemap       - ospf Routemap
summary        - Summary
gw-8090bc> show ospf interface
CLINFR0349  Incomplete command.
gw-8090bc> show ospf interface eth0

Name  IP Address    Area ID  State  NC  DR Interface  BDR Interface  Errors  
eth0  192.168.0.21  0.0.0.0  DR     0   192.168.0.21  0.0.0.0        0  

gw-8090bc> show ospf summary       

OSPF Router with ID  192.168.0.21  Instance  default  

SPF schedule delay: 2 secs
Hold time between two SPFs: 5 secs
Number of Areas in this router: 1
    Normal: 1      Stub: 0      NSSA: 0
RFC1583 compability mode is on
Number of Virtual Links in this router: 0
Number of UpEvents: 1  Number of DownEvents: 0
Default ASE Cost: 1
Default ASE Type: 1

Area: 0.0.0.0

    Number of Interfaces in this area:  1
    Number of ABRs: 0      Number of ASBRs:  0
    Number of times SPF Algorithm executed: 2
    No Area Ranges Configured
    No Area Stubnets Configured


gw-8090bc>
So far so good. But we'll find out if this actually works once we set up another router to talk to it. We'll tackle that tomorrow!

Hope you have enjoyed this little taster of GAIA, more to come soon!